How to: Create a Project using Gantt scheduler
There are basically two methods when creating projects. The advanced one utilizes a Gantt scheduler for a visual approach with drag and drop capabilities. The simple method is a flat list view to the project. Both methods have their uses.
Creating a Project with Gantt scheduler
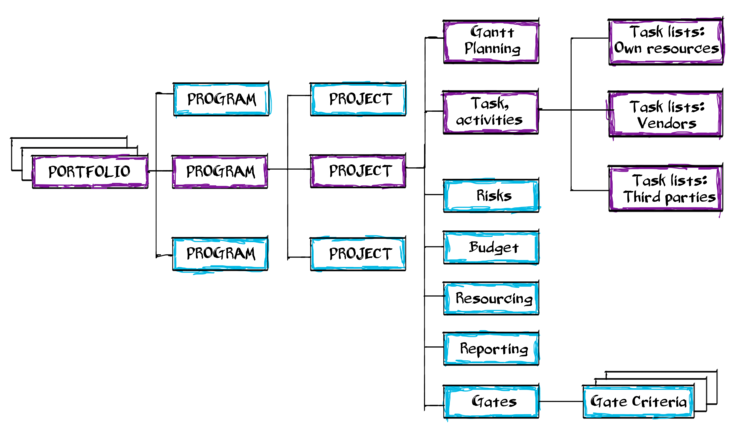
The advanced method utilizes a Gantt editor for planning. It is a great way to visualize the project, add dependencies, gates, phases and multi-tiered tasks.
Create a project
- Navigation bar -> New -> Project - create your project. Fill at least the mandatory information.
- Set up project Security from the Tools menu - see help article on Project Security.
- That’s the mandatory setup done, all other fields are optional.
- Open the Gantt editor to start planning your project by clicking Gantt.
Plan the project
Note: for additional help on using the Gantt editor, please see the page help.
Start by Adding phases and activities.
- Add Phases - Phases can be added more than one at a time and can be renamed. Note: you need to add at least one Phase first.
- Add Activities - We call Test cases, Developments and Defects Activities. These are different activity Types.
Add gates
- Add -> Phase - Select gate(s) to add.
Gates are are project checkpoints and have criterias that need to be ready at this point. Gates are added from Gantt and the criteria is managed from the project main page - gates tab. There you’ll find the check boxes for each criteria.
Copy activities from a previous project:
- Go to Project editor (project main page)
- Click Tools -> Copy from project. Choose project and activities. When copying, new activities are created and all previous data is reset.
Assign activities and budget hours
- Assign activities to by clicking the Resources column next to the activity and set assignee and resources.
- Add
- The assignee receives an email notification when the activities are published. Assign cases to multiple people by adding them as resources.
- Hint: Mass change (Edit -> Mass change) is a great way to make changes to multiple activities at once.
Add dependencies
You can add dependencies between Activities.
To add dependencies:
- Mouse over an Activity in the Gantt scheduler. (You need to have a schedule set.) A circle appears at the end of the Activity’s time bar.
- Drag and drop to link with another activity.
- Double click on the linking arrow to edit, remove and change dependency type. Default dependency is finish to start.
Publishing activities
Activities won’t appear elsewhere in ProjectTOP until they are Published.
To Publish Activities:
- Set their Organization, Activity Type and Activity Status. This can be done with:
- Mass change to multiple activities - Edit -> Mass Change or Editing Activities by right clicking them.
- Use Views -> Publish to see if Activities are publishable.
- Publish Activities by selecting them and clicking Edit - Publish Activities.
- Published Activities’ names are displayed in light blue colour.
- If Activities are created elsewhere than the Gantt editor, they don’t need to be published.
Project execution
When your project is planned and activities are published, resources will find their tasks via email notifications or using theirt cases by email notifications or from My Activities or Observatory views. Project progress is mainy reported by changing Activity Status.
Tracking project progress
Your project plan is updated in real time as project resources change the status of their activities. See also:
- Observatory (Navigation bar -> Views -> Observatory) is a great, customizable view to multiple projects at once.
- Dashboard (Navigation bar -> Reports -> Dashboard) provides real time reporting.
- Halvin tapa ostaa kallis ja toimimaton ohjelmisto 03.04.2017
- Versiotiedote, versio 3.13 29.03.2017
- 15 mielensä pahoittajaa 27.03.2017
2016 © Project-TOP Solutions Oy. Yksityisyyskäytäntö | Palveluehdot